Pages

Tuesday, December 11, 2012

Stamp Carving Roundup: Part 2 Designing and Transferring Image


Reminder: If you are looking for a comprehensive resource/ post on this topic which gives you complete information, alternatives, and comparisons then go here:
http://www.nettally.com/palmk/Rubber_Stamp_Carving_Tips.html

If you are looking for a "this is what I do/what a reccommend for beginners" then this post is for you.
Part 1 covered assembling your materials
Part 2 will cover designing your image and transferring it to your carving material (this is part 2)
Part 3 will cover carving your design
Part 4 will cover stamping your image

 Designing your image: 
Things to keep in mind

1. Start small and simple- if you get overly ambitious (small lines, super large, very detailed) for your first stamp then you will get angry like Hulk.
2. Remember- you will be carving the white/pink space, not the dark/pencil space. Therefore, the more dark the less you have to carve.
3. You can edit out items when you trace (use tracing paper).
4. I recommend staying away from words until you get used to carving drawings


Steps
Step 1: Draw a picture
Step 2: ... there is no step 2


Transferring your image:
Steps
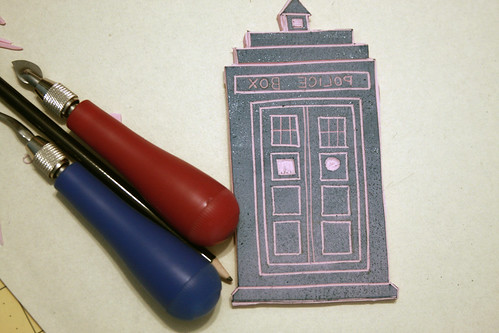
Step 1: Lay a sheet of tracing paper over your image


Step 2: Trace ONLY the parts of the image you want to keep; note that in the picture above I kept only the owl and not the words. This is where the gritty pencil really comes in handy
 
Step 3: Cut a piece of carving material to the approximatae size of your image
 
 
Step 4: Put your tracing paper image side down (gritty pencil side down) to the carving material
Step 5: Rub the tracing paper with your finger or other object (I use the bottom side of a carving tool)
 
Step 6: Carefully remove the tracing paper

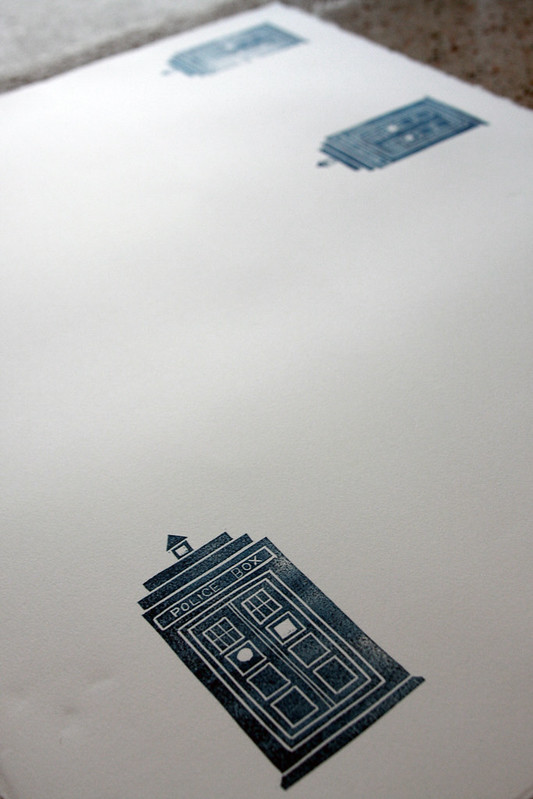
The image left on the stamp with be the mirror image of your original image (which is good!)

Next up (in hopefully January): 
Part 3: Carving your design

Monday, December 10, 2012

Man-Cowl Mystery Solved

So, I love Ravelry.

I was PMed from a user today (anna-fo-fanna) about my search for the mysterious man-cowl (original post here). It turns out that I didn't dream up the cowl, a pattern already exists! I knew I wasn't nutters.

Here is the pattern I must have found but then didn't queue and therefore went through the process of recreating from (at the time uncertain if real or imagined) memory. The main picture doesn't exactly look the same but when you open the project pictures it looks exactly the same- which is why I suppose I had such difficulty finding it again. I think the only difference is that mine has a 1x1 rib and the original pattern doesn't (so... really... exactly the same).

I deactivated my reconstructed pattern on ravelry and contacted everyone who'd downloaded it or started the project and referred them to Michael Wynne's pattern. I also encouraged everyone to link their projects to Michael Wynne's pattern.

If you still want my reconstructed version of the pattern please feel free to contact me on ravelry and I'll send you the PDF.

Now... back to work!

Friday, December 7, 2012

True Story: San Diego Stitch Pattern

I recently returned from a trip to San Diego for work. When I was there I felt inspired (I know, I know, I'm a doofus) by the boats and sand and Mexican cultural and architectural influence so I developed a new stitch pattern (at least I've not seen it before but, knowing knitting, it's probably already been developed by Elizabeth Zimmerman's cousin's roommate's ravelry BFF's third bridesmaid).
What it looks like in the nude... color yarn.
The picture above is unblocked. I have hopes that it will even out and open up with blocking. I'd also like to try it with a lighter weight yarn.
A chart that only makes sense to me.
The plan at present is to finish the nude cowl and post the pattern to ravelry. I'll likely also make a few swatches in different yarn weights and yarn types. Regardless, I like it. Maybe one day I'll turn it into a shawl...

Wednesday, November 28, 2012

Soap Making Links / Resources

A friend of mine (who is beautiful and amazing) asked me recently to send her some information on how to make soap.

I started making soap for entirely skin-selfish purposes several years ago. I adore how real soap feels and how it actually helps moisturize  (note, I use the word "moisturize" even though it is abhorrent sounding) instead of sucking skin dry like the detergent "soap" you buy from the store (ala Dial, Dove, et. al.) and even most boutiques.

So, I'm not going to re-create the wheel; I'm just going to gather everything that's been useful to me in one place (which will hopefully be useful to you).

Resources I Use Frequently... so as to NOT recreate the wheel
1. Tutorials - I like craftster.org for tutorials (for soap especially) because they'll answer you if you have questions; however, chances are most questions you'll want to ask have already been asked and answered; therefore you should do a thorough search of the board first.
     A) Start here; this is the best tutorial I've found for basic soap making
     B) Then, go here; this is for after you've made a few batches successfully.
2. Soap calculator: This is ESSENTIAL for soap making and is a godsend. Fiddle around with it to make your own recipes.
3. 99% of what you need can be bought here: Wholesale Supplies Plus but, they don't sell lye...
4. The other 1%: Buy lye here or you can find it at some Ace Hardware stores. I recommend you call Ace ahead of time (before driving there) to ask if they have it.


Other Notes of Note From My Brain
  1. Equipment: 
    1. I recommend a hand stick blender. My friend J started using it in her soap making and it helps (a lot) bringing the soap to "trace." I have this one and use it only for soap making
    2. A digital scale is essential (see #6 below)
  2. Speaking of essential- Essential Oils: So... once you start making soap you're going to realize that essential oils are the coolest and yet the most costly part of soap making. They have a lot to do with how your soap makes you feel and have therapeutic properties. There is this place called Essential Oil University that is pretty amazing. I buy my EO's there. However, I heard a rumor that they stopped selling EOs in less than $10K bulk orders. I don't know if this is true as I haven't purchased anything in over a year... Regardless, the research available there on EOs is really impressive.
  3. Soap Molds: I use old milk and egg beater containers/cartons to make my soap. I used to struggle with lining molds with parchment paper and cursing like a motherless sailor trying to get the soap in and out. Now, I pour the mixture directly into a cleaned out container then, 24 hours later, peel back the paper/ cardboard and toss it (the carton). This has made my soap making 100% stress free and I love it.
  4. Not included in the above tutorials (I think... or maybe touched on, but it bears repeating): after the mixture is poured into the mold I cover it with parchment paper and wrap it in a warm blanket and LEAVE IT ALONE for no less than 24 hours. Do not look, do not touch it. It is important to wrap it in a warm blanket so the soap doesn't cool too rapidly. This has always worked for me.
  5. Don't be too ambitious with your first batch: keep it simple so you don't get put off. Try an olive oil, coconut oil, grapeseed oil soap first (all of which you can buy at your local store). I recommend 20% coconut (for hardness and lather), 40% olive oil, and 40% grapeseed oil. Also, use lavender as your first EO. Everyone loves lavender and it is fairly benign in terms of affecting the texture of your soap (some EOs can drastically effect the soapafication process). Also, don't use beer or milk in your first few batches. You will just become enraged and start smashing things.
  6. Be precise: You have to be as precise as is possible (to the gram) with your water, lye, and oils. If your soap fails it's likely because you were imprecise.
 Ok, so, that's it. Happy soaping!!
(PS sorry for re-using old pictures. This post reminds me I need to make some new soap!)

Sunday, November 25, 2012

Gift for Him Knitting Pattern: The Surly Man Cowl

Link to Pattern
I was browsing around ravelry late at night (my first mistake) and thought I found a cowl pattern which I loved and which I felt would be perfect for my husband. I didn't favorite it or queue it (second mistake). Rather, I made a mental note (if you are anything like me then your mental notes are written in Latin and in disappearing ink on the back of an old, greasy pizza box) regarding what the cowl looked like (I thought swirly?) and the search term I used (I thought "man cowl"?).

Well three or four days later, when I was ready to start knitting the cowl, I couldn't find the pattern. Therefore, I just knit it based on my murky midnight memory. Link to my project page
Here it is on Mr. Surly Man himself. I was lucky to get the shot. Maybe I'll post a better picture when I can get him to hold still longer... Regardless, back to my story:

After an extensive search on ravelry several days later I still couldn't find it or a similar pattern (this one is the closest and uses yarn-overs and decreases I think whereas I wanted to use only knits and purls). Therefore, I've quickly typed one up.

It doesn't have to be for a Surly Man, it will work for a Surly Woman just as well.

It's simple (really, really simple) and brainless (hence, a good pattern for me). I hope you make it for the surly (wo)man in your life.

Wednesday, November 21, 2012

Christmas Cards and Santa Robots

Tomorrow is Thanksgiving but, in my brain, Thanksgiving is over and it's time to prepare for Christmas. I think this might be because last year didn't feel like Christmas at all; it was: whhoooooosh! Happy New Year. What? Christmas? Yeah, that happened; I think you were asleep. We didn't want to wake you up.

Last year's Christmas wasn't stressful; in fact, I don't even remember it. Work was stressful and I was staying late at the office quite a bit, working weekends, and spending no time doing Christmassy stuff with my family. I feel like this year I am making up for last year; this year we're having Christmas squared.

First up: Christmas Cards

I really like robots. I've decided that Robo-Santa will be the theme of our Christmas cards this year.

Four, count them, four Robo-Santas
 The stamp set I carved is modular so I can switch out the hat and center- just in case I need a Valentines robot or an Easter robot.
Two sets of legs, two options for arms
 I carved two sets of legs and arms so I could make Robo-Santa tall or short depending on the card size.
Stamping is the fun part. I like how he turned out looking a little nervous. It's the cutting out part that gets tiresome.
Pretty soon I'll be rich in Santbots, or Robo-Santas, or RoSanBotas.

I was thinking of stamping him in various poses and printing some Robo-Santas over at Spoonflower, maybe make a Robo-Santa pocket advent calendar. As usual, I think my ideas are beyond the limitations set by time. But, it's fun to think about.

What about you? What are you doing for cards this year?

Thursday, November 1, 2012

Chicago -OR- What I love about middle children

Warning: this is going to be one of those not-necessarily-crafty, essay type posts. 

There is something really special about Chicago. 


Chicago is the proverbial middle child of large US cities. Some might consider this analogy only in reference to Chicago's geographic location (it's in the middle of the country). However, the analogy is multifaceted; like most middle children and like books between elaborate bookends, Chicago can sometimes be easy to overlook.


It is smart and genuine but always compared- for better or for worse- to its older and younger siblings: it's the less notorious but smarter sister to New York; it's the less ostentatious but considerably more genuine sister to Los Angeles. It is breathtaking and beautiful and yet somehow caught in the blindspot of popular consciousness.


But, I wonder- like most middle children- if Chicago prefers to shy from the onerous and usually dysfunctional limelight of notoriety; I hypothesize that it is more than to content to be smart and genuine and breathtaking without attracting the attention that plagues those that are notorious and ostentatious.

Wednesday, October 31, 2012

Tuesday, October 9, 2012

Leather Wallet from PANTS! Recyling and Upcycling

The Short Story:
Before:

After:

The Long Story: So, I bought these leather pants...
"These" leather pants
I've always wanted to start a blog post with the phrase: "So, I bought these leather pants"

Unfortunately, (or, fortunately) the pants were not for me to wear. The pants were for me to deconstruct and reconstruct. I was thrift store shopping with the husband on a rare afternoon where we were kid free and I came across them. They were $20 but the leather was in really good condition and obviously very high quality (not that I am a leather connoisseur... I wonder, are there such people? Are there "Leather connoisseurs"? If so, please raise your hand.)

I purchased the pants and planned to turn part of them into a purse, part into a new kindle cover, and part into a wallet. Since I am the #1 good-time fan girl of immediate gratification, I chose to do the wallet first.

Scraps used to make wallet.
I found some scraps to coordinate, vintage buttons, small zipper and here is what I came up with:


Starting Dimensions: 8.5" x 6" (open)
Final Dimensions: 7.5" x 5" (open)

Things I learned about leather:
1. You really, really, really need a non-stick foot to sew leather. I did this wallet without one and it super-sucked. I won't attempt any more leather projects without it. The issue is that the sewing machine foot pulls against the leather which makes it stretch as you sew. The leather stretches but the cloth material does not. This makes the cloth bunch/sag when the leather returns to its previous shape. I'll post an update perspective on sewing with leather when I get a chance to use the Teflon foot I ordered from Viking.

2. It is great for inlaid zippers. Since the edge of the leather doesn't fray, adding the zipper was a piece o' cake.

3. Use double sided tape instead of pins: it will stick to the leather and create just enough adhesion to keep the project together. It's not like you're going to wash your finished object in the washing machine so... who cares about washibility of the double sided tape. 


Final thoughts: I love the wallet. It fits my phone, cards, and some change. Very happy with it. Looking forward to making more, this time with the Teflon foot.

If you've ever worked with leather I'd love to hear your tips/ tricks/ thoughts.

Thursday, October 4, 2012

Yarn Indecision

So, I've started a knitalong of the Staghorn Tunic with the fantastic looptange. After a great deal of deliberation I finally decided to use stash of Queensland Aran for the tunic. The yarn is a little uneven and now I am having second thoughts...


I love the pattern, I love the yarn, I just don't know if I love the yarn for this pattern...

Most of the projects completed thus far for the tunic use grey. Should I start over with grey/different yarn or should I continue with the green?

Thoughts??

Monday, October 1, 2012

Kind of a random post: Doodling and Halloween

I've become rather fond of doodling. Some interesting doodle facts:
1. A group of geniuses got together and decided to charge people in order to teach them how to doodle.
2. One form of this is called Zentangle. I feel like Zentangle must have actually been created by people who- in 7th grade- were really impressive at doodling but not much else.
3. Zendangle aside, there is a theory that doodling is really good for the brain, aiding with relaxation and memory (see Andrade, Jackie (January 2010). "What does doodling do?". Applied Cognitive Psychology ).

Lately I've been doodling Halloween faces-


I don't know why but most of the faces are missing noses. I'm just not that great at noses. My plan is to make the face stamps first then doodle/carve some interchangeable bodies (torso, arms, legs). Maybe I'll finish before Halloween and use them for cards this year! ... a much more likely scenario, however, is that I spend the next 5 months carving them instead of making Christmas Cards and rediscover the stamps next year 2 days before Halloween. ;-)

Saturday, September 22, 2012

I came, I saw, I pieced a kite quilt

I've made many patchwork baby blankets (or- what I call- quilt cheating). I've always wanted to actually quilt (what I think most people call "piecing") but I've never taken a class and didn't really know where to start.

Then I saw this quilt and fell in love.

So, I faked it:

  
I sketched out my own pattern/pieces and made the kites/diamonds much larger than the original (as I'm a fan of instant gratification and larger pieces meant less measuring, cutting, ironing, pinning and sewing...)


I'm not 100% sure that I actually did "piecing" correctly, but- if not- I'm pretty sure I faked the hell out of it.

Thursday, September 13, 2012

My thought for today: Do what you love.


At the risk of being a complete cliche, I have decided to write a chick lit romance novel. That's right. I'm doing that thing which will likely make me ridiculous in the eyes of everyone who doesn't actually matter. Honestly though, peeps, I can't seem to bring myself to feel to embarrassed about it because I'm having too much fun. I've added a page to this blog entitled, "Writing Projects."


Maybe I've crossed over that youthful line into adult-ville, where things like modesty and fear of being  stereotyped don't really seem to matter.

I love being a mom and I love my kids. I love the work that I do. I have a great husband (and I love him). I love to knit. I love to carve stamps/blocks. I love to sew. I love red wine. I love laughing with my friends. I love to write. And, I love a good romance.

While you're doing what you love, make sure you give the two hand, two finger salute to anyone who tries to make you feel bad for who you are or what your passions are. If those people mattered, they'd support you and love you regardless and they definitely wouldn't want you to feel ridiculous.

Just, do what you love.

Own. It.

Tuesday, September 11, 2012

Stamp Carving Roundup: Part 1 Assembling Materials

If you are looking for a comprehensive resource/ post on this topic which gives you complete information, alternatives, and comparisons then go here:
http://www.nettally.com/palmk/Rubber_Stamp_Carving_Tips.html

If you are looking for a "this is what I do/what a reccommend for beginners" then this post is for you.
Part 1 will cover assembling your materials
Part 2 will cover designing your image and transfering it to your carving material
Part 3 will cover carving your design
Part 4 will cover stamping your image

1. What you need to get started
  a. Pencil
  b. Tracing paper
  c. Carving tool
  d. Carving material
  e. Self healing mat
  d. Paper/fabric
  e. Ink
  f. A piece of wood (optional)
  g. Stamp adhesive (optional)


2. Where to get it/ what I reccommend/ why I reccommend it: You can buy a kit here from Amazon if you want to minimize your expenses but it doesn't contain everything I recommend. What I recommend is as follows:
  a. Pencil- I prefer a graphite pencil as it will leave a darker image than a #2 when you transfer to or draw on your carving material. You can get this at any art or craft supply store; I bought this kit (Prismacolor Scholar Graphite Drawing Pencils) from Dick Blicks- once I realized the #2 wasn't ideal- in order to try out different pencils.
  b. Tracing paper- you can get this at any art or craft supply store; I use this one (Strathmore 300 Series Tracing Paper Pad) and bought it at Joann's.
  c. Carving tool- you can get this at any art or craft supply store; I use this one (Speedball Lino Set No. 2) and bought it from Dick Blick.
  d. Carving material- I use this one (Speedball Speedy Carve Blocks) and buy it from Dick Blick.
  e. Self healing mat- I use this one (Fiskars 8-Inch by 8-Inch Self Healing Rotating Cutting Mat) and bought it from Joann's
  d. Paper/fabric- use whatever floats your boat! I find that, for fabric, cotton and linen work best and white or natural color fabric makes for a more vibrant image.
  e. Ink- you can buy ink pads that work on paper at any craft store; I have several and prefer none. For fabric I use VersaCraft and buy it from Amazon (best price I've found although you can sometimes find it in an etsy destash sale). I like VersaCraft because it is easy to use, readily available, and heat sets quickly. There are other options out there which will give you more consistent results but- in my experience- are expensive, messy, and require several days to set. Please let me know in comments if you know of any other viable alternatives.
  f. A piece of wood or acrylic block- the wood needs to be at least as large as your stamp. I have scrap wood a friend cut for me specifically for my stamping. If you aren't going to mount your stamp (and there are pros/cons to mounting) then you could use a book instead of wood.
  g. Stamp adhesive- only if you are going to mount the stamp.

Again, the link I included at the beginning of this post is a great resource but- that stated- when I first started to carve stamps I felt a little overwhelmed by all the information provided on the web and felt like- as a beginner- I had too many options (types of carving materials, types of carving tools, types of transfer methods).


Next up (in October):
Part 2- Designing your image and transfering it to your carving material

Friday, September 7, 2012

They're bigger on the inside...

I seem to have a collection of friends who enjoy Dr. Who. I really enjoy the show although I haven't been watching recently. AnyWho, I wanted to make something Tardis related for all my Who friends (WHO also happen to all knit or crochet).

 Here is the finished notions/ needle/ hook case.

IMG_1334 by zilamonster 
The Tardis stamp was fairly straight forward. I used speedy carve and my speed ball carving set (both can be purchased online at Amazon or Dick Blicks)

I did a few test prints on cotton paper to make sure the stamp had sufficiently clean lines. The great thing about stamps (well, one of the great things) is how mufti-purpose they are. I feel completely justified in making Tardis Festivus cards this year.

I also printed the bottom blue band with 'Bigger on the Inside'. The ink I use is VersaCraft for fabric. You can pick it up on esty or on Amazon.

The only regret I have is that I only made three. Next time I need to remember to make one for myself.

Monday, September 3, 2012

Bias Shirt Smock- Tutorial

Find the tutorial here. It's in PDF.

Feel free to post any finished objects (or even WIPs) to the flickr group here

Background: When I went to SAW this last year (I feel like a lot of my posts start out this way...) I used/wore a smock during my classes; I made the smock last year and briefly blogged about it here. I have found the smock to be incredibly useful and wear it when ever I'm crafting (especially with the kids, the pockets are like having another two pairs of hands).


Original smock, still in heavy use
Anyway, the lovely ladies at SAW gave me many compliments and asked if I had a tutorial for it. I spent most of this summer promising myself I would complete a tutorial by Labor Day. So, with 28 minutes to spare, I did! Last night at 11:32pm EST I sent the finished tutorial to the lovely MB who agreed to review it for me.

Back of the green smock, front of the purple smock.

My fabulous drawing of said smock. I'm sure will be worth millions (of pesos) one day
Thoughts on writing the tutorial: Writing my first tutorial was really difficult. I kept thinking "what would I want to know?" and tried to use that as a guide. However, I usually want to know too much too quickly. Therefore, I split it up into 3 sections: 1) overview/materials/supplies, 2) quick and dirty diagrams, 3) detail instructions.

Where possible I also tried to include both drawings and pictures of what was happening (example below, how to make a bias fabric trapezoid).
Hoping this doesn't look like a diagram of a football play
Basically, this is a real image of the drawing  above.
The two key things in this pattern/tutorial are using bias fabric and choosing a shirt you like but which also fits easily over your chest and shoulders without too much trouble. As you can see below, the shirt I used to make the latest smock has plenty of room around my rib cage.

Using a large shirt is preferable, just as long as it's not falling off...
I purposefully made this smock rather plain; rickrack can be your friend. 
 Also, something I don't go over in the tutorial is embellishment. I'm excited to see what people do with this simple design to make it their own.
The pocket fabric is one of Anna Maria Horner's; I have a girl crush on her, it's true.
I hope not only that you all make it but actually enjoy making it. Please let me know if you encounter any issues; I'd like to improve my tutorial writing abilities so don't hesitate to let me know if parts are unclear/need additional info.

Happy smocking! and special thanks to Maya for her encouragement.