Wednesday, June 15, 2011
SAW Spring 2011: Post 4 of 4 Learn to Spindle
My last class at SAW was Learn/Start to Spindle with Denny Mcmillan. This class was only a half day but Denny did a really thorough job teaching the rudimentary as well as touching on the advanced methods of spindling. The other really great thing Denny did- other than bringing incredible positivity and admirable patience even though this was her 5th time teaching the class in two days- was bring examples of different spindles she'd collected through the years, yarn she'd spun via spindle, as well as finished objects made from spindle yarn.
Beginning: Denny set us up with a very sturdy spindle, some fluffy white fiber, and some beautiful, soft dyed fiber. I was glad to have arrived early so I could scope out my favorite of the dyed fibers and claim it as my own. She provided some great background information on fleeces, selecting fleeces, washing fleeces, etc; she also covered the basics of fiber texture. She then had us "draft" the white fiber and spin without dropping the spindle. After "mastering" (or at least practicing) spinning without dropping the spindle, she showed us how to spin by dropping it. This portion of the class was the longest.
Middle: We took a break from spindling with the white fiber and Denny reviewed the other spindles she'd brought, the yarn on each, and admired the finished objects made from yarn spun via spindle.
End: We switched to the dyed fiber, drafted and drop spindled. Denny did a admirable job helping all of us and spent a great deal of time with those who needed or asked for it. She was very kind and patient.
Wrap-up: I felt I learned to spindle proficiently in Denny's class; honestly, though, I can't really see myself spending any time doing this soon. Perhaps I am too saturated with crafts at this point. I've tucked my spindle and fiber away for one of those days when I'm inspired to try something new.
Saturday, June 11, 2011
SAW Spring 2011: Post 3 of 4 The Three Tools
My second class at SAW was "Three Tools" with Terri Dautcher. Terri- the person and the teacher- was unbelievably generous, good-natured, funny, kind, and patient. If you ever have the opportunity to take a class with Terri you should run, jump, and elbow others out of the way- maybe in the face- to take the class (not really...). Also, her studio was nothing short of astonishing and is similar to how I imagine heaven must look. She has a place for everything and everything has a place and she literally has everything you could want for crafty or fine art endeavors.
Beginning: Terri picked us up from the camp and drove us the short distance to her house/studio where we would be spending the rest of the day. We filtered into her studio and all had our thunderstruck/speechless moment of awe. Once we recovered, Terri gave a very thorough review of the tools we were going to be using for the day: jigsaw, drill, and tape measure. She also reviewed power sanders, hammers, different types of nails and screws, washers, drill bits, importance of a level, and wood glue. She then encouraged us to use the surroundings, the wood available, a shelf full of idea books, and other various accoutrements as inspiration for designing our boxes. You can see, from the picture below- my ginormous smile and stary eyes- that I was a little overwhelmed by inspiration. This part of the day lasted a bit over an hour.
Middle: We all sketched, drew, and measured our designs for our boxes. Terri then took us outside and we started marking and cutting out the wood. The really cool thing about this part of the day was how actually helpful, kind, and supportive everyone was. We all took turns cutting with the saw, holding other people's wood so they could cut, sharing tools, etc. Assembly was equally utopian, classmates holding other classmates boxes so they could drill pilot-holes, spread glue, and screw the box together. This part of the day took the longest, at least 5-6 hours.
End: The end was fairly staggered. Terri gave us free-range to use any of her craft/art supplies and allowed us to stay as long as we needed to in order to finish decorating our box. Some people lined their boxes with fabric and used Terri's sewing machine to finish the job. She offered ideas and perfected the role of creative conspirator.
Wrap-up: We now use the box as an art-catch-all on the kids' craft table. It turned out great for storing the kids works in progress as well as general supplies.
One more parting shot of the fabulous studio...
Thursday, June 9, 2011
SAW Spring 2011: Post 2 of 4 Block Printing
My first class at SAW was Block Printing with Lizzy House. Before I go on further I just want to say (er... type) how much I enjoyed Lizzy's teaching style. For me, for my "creative process" (ugh, I feel like that term is so pretentious... how about "mojo standard operating procedure" instead?)- for my mojo standard operating procedure, (MSOP for short) I felt Lizzy provided just the right type and amount of information in order for each person to successfully learn how to lino block print.
Beginning: The class started with each person introducing themselves and why they decided to take the course. Lizzy then encouraged us all to work on our designs (sketches) and informed us that she would be going around the room to look at our materials (one at a time). Everything and everyone was great (per Lizzy). All the materials were great, nothing was a problem, we'd all done extremely well even though we'd all brought something slightly different. She used the opportunity to review all the different kinds of carving medium and described typical use for each. Additionally, she took some time to review how to make a simple repeating pattern (turning quadrants 1, 2, 3, 4 into 4, 3, 2, 1). Otherwise, she moved about the room answering questions, offering guidance, and periodically checking on each person/our comfort level (if we were quiet or didn't ask for help).
Middle: Some people brought transfer/tracing paper and pencils and were able to rub their designs on to the lino block. Others (like me) hand drew the design on the block with a pencil. Lizzy gave an overview of safe carving procedures and stressed repeatedly that one should never ever carve toward oneself nor place an errant finger in the path of the carving instruments. The carving portion of the day lasted the longest (approximately 4 hours).
End: Lizzy had everyone gather around a large table and she demonstrated proper use of the glass, ink and brayer in applying ink to the lino block. The class then pulled together and each person set up a station with a different color. We spent the last part of the day inking the lino block and printing the fabric (about 2 hours).
Wrap-up: After we were done and all materials/work spaces had been cleaned up and stored away, Lizzy had the group lay all the fabric out and circle chairs around the finished pieces. We each described what surprised us and we liked/didn't like about the process/course- somewhat of a shared lessons learned.
My specific MSOP: I was completely unprepared. I had no idea what I was going to do nor did I bring anything with which to sketch (I'm not a sketcher nor do I consider myself an artist; the closest thing I do is doodle incessantly during conference calls and staff meetings). I scoured my bag and found a hotel pen and the small blank journal provided to us in the SAW bag (thank goodness for the SAW goodie-bag). As Lizzy went around the room it soon became apparent that I had the largest lino block (6X9) and, therefore, would have to sketch something that would fill the majority of the block but I didn't want to be cuckold to a large single image. Everyone in the class was supportive and generous. My table-mate, Caarin (I think I spelled that right,) offered helpful encouragement and we troubleshooted the first phases of carving together; I was able to borrow a pencil from the lovely Carol and a no slide mat from Lazymama. In the end I was astonished by all the kind words for my design and felt very lucky to have been in the company of so many talented women.
I was so encouraged by the comments on my design that I've decided to plan set of fabrics centered around these independent owls. It will take some time but I hope to have a complete set ready in the fall... will most likely use spoonflower. I figure, even if no one is interested in the fabric, at least I'll have a great time with my MSOP creating it.
Tuesday, June 7, 2011
SAW Spring 2011: Post 1 of 4
I returned yesterday from SAW. For those of you who don't know, SAW is Squam Art Workshop, held twice yearly in New Hampshire. I learned of SAW from news posts on Ravelry. This was my first time attending any type of art workshop. As an overview-
The Good
The surroundings: the landscape was- although it may read as cliche or high on the cheese factor- really lovely and inspiring. Everything I read prior about the beauty of Squam lake and the campground were spot on.The classes: I was lucky to get into Lino block printing with Lizzy House, Three Tools with Terri Dautcher, and Start to Spindle with Denny McMillian. I really, really learned a great deal in each of the classes. I also enjoyed the format, being able to spend an entire day dedicated to one topic was something of a luxury for me. I plan to dedicate a post to each class over the next week.
The people: I met some amazing, talented, and creative women who- I am sure- I will know and cherish their friendship for the rest of my life. Joan, Bev and Sarah were as inspirational as the surroundings at Squam Lake. Otherwise, 99% of the time the attendees and "Squam People" were really gracious and friendly. I think with any large group you're bound to have a curmudgeon here and there. For the most part we were able to avoid the singularities of negativity.
The food: yum :-)
The lodging: Perfect. We had a fire every night except the first night (as it was warm). We slept on comfy beds and knit by the fireside in rocking chairs or on the pillowy couch.
The Bad
Timing and Distance: SAW should be every weekend and I should live in New Hampshire.The Ugly
Mosquitoes: Yeah, there were mosquitoes. Yeah, they bit me. Yeah, their deaths were ugly and their funerals were poorly attended.
More to come this week- next up will be my block printing adventure with the independent owls
Monday, June 6, 2011
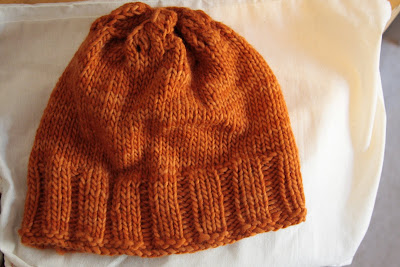
Haughty Hat
I knit this hat in one day during the Spring 2011 Squam Art Workshops. Since I had no access to the internets, I made it up as I went. Link for the pattern.
This pattern uses the same basic leaf chart as the Woodland Shawl (by Nikol Lohr) on Ravelry- except it only does the first leaf and reduces the purl stitches to 1 instead of 2. However, if you don’t want to use the leaf pattern (which actually isn’t really visible in the final product) you can use a different stitch to give it some texture. Also, don't block this.
Subscribe to:
Posts (Atom)