Pages

Saturday, December 31, 2011

Monday, December 26, 2011

Handmade Christmas presents are the best... THE BEST

This year I was able to actually make a number of handmade Christmas presents. One in particular was exciting to finish/give:

This should look familiar; it is on my 2011 Craft Resolutions list (check another one off the list WOOT)

I was also able to wing these peg dolls; they are heavily based on results returned from an image google search for "peg doll." I love google image search like a fat kid loves cake.

Best of all, the house and dolls were made for a special little girl who we all love; Jonah picked the fabric and helped me stuff and sew; Nora picked the colors to paint the dolls (note the green hair and lots of pink).

I love it when a plan comes together.


Monday, December 12, 2011

Adventures in Soap

I made some coffee soap.
Fats: coffee bean butter, cocoa butter, coconut oil, palm oil, and olive oil Essential oils: Frankincense, cloves, and cinnamon Added: coffee grounds

Then, I made some peppermint and poppyseed soap.
Fats: palm, coconut, olive Essential oils: Peppermint and cinnamon Added: poppy seeds

Then, I had all these left over peices of soap (coffee soap and poppy seed soap) when I cut off the rough edges. So, I decided to makes some lemon soap-
Fats: palm, coconut, olive Essential oils: Lemon Added: pieces of other soap

- and stick the left over pieces of the other two into the mold right after trace- and this is what I got:


It smells like sunshine. I think I'll call it "Sun Spots"

Thursday, December 8, 2011

Some Progress

So, the end of the year is nigh and I have to review my "Craft Resolutions List" for the year...

Craft Resolutions List-
1. Finish this shawl - DONE

2. Finish Lily's baby blanket... not done
3. Finish a crochet motif baby blanket ... not done
4. Make knit boots ... not done
5. Design and make a slew of felt crowns (birthday gifts) for the birthdays this year ... not done
6. Design and make an advent calendar ... DONE!!! of note, I intended to sew a calendar that we could use yearly. This one is fun but I doubt it will last till next year.
7. Learn to wash, card, spin and dye fleece, roving, yarn ... I washed yarn and I learned to drop spindle so I'm going to say this is a 50% done.
8. Make something (tea wallet, bag, whatever) with reverse applique ... not done
9. Design and post at least one knitting or crochet pattern - DONE my patterns may have been simple but, darbginit, I did it!


10. Design and make Nora a new, smaller, softer baby doll ... not done
11. Make fabric houses/carry-alongs I made some progress on this! I have the plastic pieces ready to cover. I just have to do the actual sewing part. Oi!

12. Make a real quilt square ... not done

So, that's not terrible. It's not good but it's not terrible.

Merry Christmas!

Tuesday, December 6, 2011

Advent Calendar Awesomeness

I've been wanting to make an advent calendar for a really long time.


The kids painted the background (cork board), helped create the designs on and dictated the layout of the boxes.

Materials used:
1. Left over favor boxes from my wedding (10 years ago! this proves that you should never throw anything away...)
2. Bling (plastic jewels) which seem to have lasted forever (and we still have more)
3. Glitter glue that Nora received for her birthday
4. Misc buttons
5. Plain markers
6. Elmer's glue
7. Cork board
8. Velcro
9. Soy paint

I... er, the Christmas Angels put little wooden ornaments in each box. The kids open one every night after dinner and hang the ornament on the tree.

Jonah was disappointed there was no candy in the first few boxes opened; little did he know that the Christmas Angels had put his Halloween candy in a select number of the packages... did I say Halloween candy?

We had fun making it and I love how it turned out.

Merry Christmas!!

Tuesday, November 22, 2011

Shirt Upgrades: Fabric and Duct Tape


My method: I purchased some plain t-shirts from amazon, picked a favorite scrap fabric piece, added fusible stabilizer, cut out a heart, and satin stitched it to the shirt.
Total time: 20 minutes
Total cost: $4.20
Total smiles: lots

The husband's method was slightly different:


Duct tape is magic.

Friday, November 4, 2011

1900 hours is 7pm... in case you were wondering

Did you know that you need a visa (not the credit card) to get into Australia? I did not know this. Any way, I went to the airport what I thought was 2 hours early for my flight to AU; when I checked in for my flight the attendant asks me if I have my visa. I looked at her in confusion. She explained that travelers need a visa to get into Australia and remarked how good it was that I was early.
I said, "How long does it take?"
She says, "About 45 minutes."
I said, "Won't I miss my flight?"
She says, "No. Your flight leaves at 7pm; right now it's 2:15."

Niiiiiiiiice. I was thinking my flight left at 4.

So, now I am at the mall food court. I have my visa and over 3 hours till my flight.


Sunday, October 23, 2011

Friday, September 9, 2011

Thursday, August 18, 2011

Sketching It Out

My husband has been complaining because he found several random pieces of paper (with sketches on them) strewn around the house which- as he put it- are suspicious looking.


What my husband calls "the drawings of a mad-woman" I call "Project Sketches." The sketch above is for some fabric-dollhouses I'm about to make for gifts using UK Lass's tutorial. Whenever I start a project (any kind of craft) I find that I have to sketch it out in order for the project to make sense in my brain.


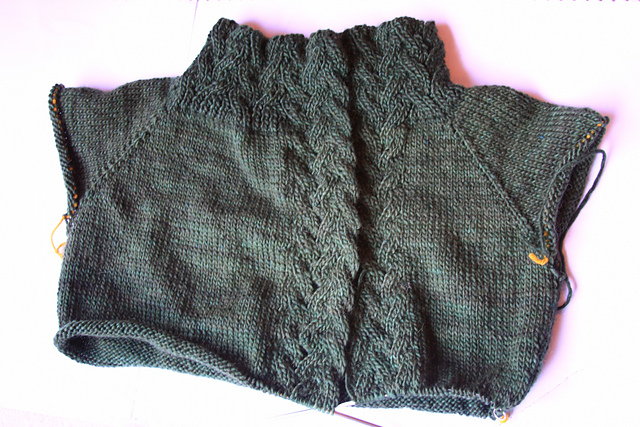
I'm also working on finishing up my first attempt at a knit sweater (Rosamund's Cardigan); I can follow any knitting pattern much better if I sketch it out ahead of time (visual representation of the text). The project sketch below is of the sleeves (long sleeves are not detailed in the pattern, I sketched out the sleeves- as below- before I started to knit them).


I wonder how many other people feel the need to sketch out projects prior to starting; I'm sure I can't be the only one...


Saturday, July 30, 2011

My Review of Knit Nation (London, UK)

This post is long overdue.

I have to preface this post with a few caveats. If you want to skip the caveats and go straight to the review then know that you do so at your own risk (of being uninformed...)

Caveat 1) I was in the UK for work and happened to be there (in London) at the same time as Knit Nation

Caveat 2) I was only able to make the last day (Sunday) although I did pick up my badge and booklet on Friday evening

Caveat 3) My main disappointment with Knit Nation may not matter to you depending on who you are (your background) and what your expectations/hopes are for knitting/craft workshops. That's totally cool. In order to understand my perspective, you should know that I am a working mother of 2 great kids; this means I get very little time, peace or privacy.


The Review
Overall Rating: meh.

The Good:
A) The marketplace had A LOT of really excellent and local yarn as well as fun and functional knitting/crochet accoutrements; additionally, it didn't appear as though the vendors increased their prices for the marketplace. Although the wares were expensive, the cost would have been the same via mail order or visiting a local shop (if you could find that yarn in a local shop). I was able to pick up some lovely yarns by fiber artists/vendors of which I've never heard. Additionally, it was great to be able to talk to the actual yarn dyer/spinner/sheep herder and learn about them/their process. I think this was my favorite part of Knit Nation. I also learned that Wollmeise (pictured below) is the White Whale of yarn.


B) The knitting techniques taught in the class were really interesting. I've been knitting for about 1.5 years. It was apparent that our teacher was an expert on the subject of Estonian Lace Knitting; additionally, she peppered our lesson with fascinating (historical) facts about Estonia and traditional Estonian knitting. She circulated around the room and answered questions as they arose, she was patient with each person, she demonstrated each technique more than once and provided clear instruction. I learned a lot in the class and felt confident after the class that I would be able to replicate the techniques learned (later on my own).


C) My classmates: I loved my classmates. Every student attending Knit Nation (that I actually spoke to) was just awesome sauce with a side of fun chips.


The Bad (or, things you should be aware of prior to going to Knit Nation):
A) My main disappointment was that Knit Nation was definitely not a destination knitting experience. I felt like there was no "experience" to the event, no sense of community or any attention to branding beyond the minimum required (a sign at the registration table and name badges... you could also buy a project bag with the logo).

The environment (classrooms at the Imperial College) was/were functional yet sterile. This made me sad as- with a few inexpensive but well planned touches- the vibe could have been completely different (yarnbombing the staircase around the registration table, a cool painted canvas mural backdrop of the London cityscape, a place for knitters to write comments on colorful post-it notes and thumbtack to a board, a place for knitters to leave their WIPs for admiration- as examples).

Also, the classrooms were all over the place. It would have been better (although, I have no idea of the feasibilility) if all sessions were close to each other or around a central area. I felt very disconnected from the idea of an event. There could have been an AA meeting or a driver's education course down the hall and I wouldn't have been surprised.

I loved the idea of afternoon tea but, again, the experience was sterile. There were no detailed touches, no branding, nothing special about a white paper plate with 4 sandwiches and 4 mini cookies, a white paper napkin, and a white paper cup with a tea bag.

I was glad that I didn't spend the thousands of dollars that would have been necessary to travel to Knit Nation as a destination as I would have left feeling upset rather than just "meh."

B) Cost relative to benefit: The classes were very expensive. I took just one class (at 100 pounds = 165 USD). I understand that the event is held in London which means that it must be very expensive to arrange. That stated, I would have preferred to pay an extra 10 pounds if it meant the event was an experience rather than a sterile collection of classes.

C) In addition to the comments made above about the class and the teacher, I have to note that- at times- the teacher was a bit negative; on this point I'm not going to go into any greater detail, I'm just going to leave it there. Also, for the expense and length of the class, I felt like there should have been more content. The first 1.5 hours were spent listening to the teacher but I honestly cannot recall what she talked about. I don't think it was knitting related or related to Estonia/Estonian lace... The last 5 hours of the class were spent knitting. I've no doubt we could have learned the concepts in the first 1.5 hours then knit (asking questions when needed) as she recounted interesting facts about Estonia. We definitely could have covered the concepts and techniques that were taught over the full day in a half day.

Summary: I'm really glad I went as- relatively- it cost me very little, I met some great/fun people, got to see lovely yarn/meet wonderful yarnies, and I learned some new techniques. That stated, there was nothing that made Knit Nation special, better, or set it apart from any other knitting workshop.

For those of you who share my yarn lust, more pictures of yarn acquired at the marketplace:


Wednesday, June 15, 2011

SAW Spring 2011: Post 4 of 4 Learn to Spindle


My last class at SAW was Learn/Start to Spindle with Denny Mcmillan. This class was only a half day but Denny did a really thorough job teaching the rudimentary as well as touching on the advanced methods of spindling. The other really great thing Denny did- other than bringing incredible positivity and admirable patience even though this was her 5th time teaching the class in two days- was bring examples of different spindles she'd collected through the years, yarn she'd spun via spindle, as well as finished objects made from spindle yarn.

Beginning: Denny set us up with a very sturdy spindle, some fluffy white fiber, and some beautiful, soft dyed fiber. I was glad to have arrived early so I could scope out my favorite of the dyed fibers and claim it as my own. She provided some great background information on fleeces, selecting fleeces, washing fleeces, etc; she also covered the basics of fiber texture. She then had us "draft" the white fiber and spin without dropping the spindle. After "mastering" (or at least practicing) spinning without dropping the spindle, she showed us how to spin by dropping it. This portion of the class was the longest.


Middle: We took a break from spindling with the white fiber and Denny reviewed the other spindles she'd brought, the yarn on each, and admired the finished objects made from yarn spun via spindle.

End: We switched to the dyed fiber, drafted and drop spindled. Denny did a admirable job helping all of us and spent a great deal of time with those who needed or asked for it. She was very kind and patient.

Wrap-up: I felt I learned to spindle proficiently in Denny's class; honestly, though, I can't really see myself spending any time doing this soon. Perhaps I am too saturated with crafts at this point. I've tucked my spindle and fiber away for one of those days when I'm inspired to try something new.

Saturday, June 11, 2011

SAW Spring 2011: Post 3 of 4 The Three Tools


My second class at SAW was "Three Tools" with Terri Dautcher. Terri- the person and the teacher- was unbelievably generous, good-natured, funny, kind, and patient. If you ever have the opportunity to take a class with Terri you should run, jump, and elbow others out of the way- maybe in the face- to take the class (not really...). Also, her studio was nothing short of astonishing and is similar to how I imagine heaven must look. She has a place for everything and everything has a place and she literally has everything you could want for crafty or fine art endeavors.


Beginning: Terri picked us up from the camp and drove us the short distance to her house/studio where we would be spending the rest of the day. We filtered into her studio and all had our thunderstruck/speechless moment of awe. Once we recovered, Terri gave a very thorough review of the tools we were going to be using for the day: jigsaw, drill, and tape measure. She also reviewed power sanders, hammers, different types of nails and screws, washers, drill bits, importance of a level, and wood glue. She then encouraged us to use the surroundings, the wood available, a shelf full of idea books, and other various accoutrements as inspiration for designing our boxes. You can see, from the picture below- my ginormous smile and stary eyes- that I was a little overwhelmed by inspiration. This part of the day lasted a bit over an hour.


Middle: We all sketched, drew, and measured our designs for our boxes. Terri then took us outside and we started marking and cutting out the wood. The really cool thing about this part of the day was how actually helpful, kind, and supportive everyone was. We all took turns cutting with the saw, holding other people's wood so they could cut, sharing tools, etc. Assembly was equally utopian, classmates holding other classmates boxes so they could drill pilot-holes, spread glue, and screw the box together. This part of the day took the longest, at least 5-6 hours.

End: The end was fairly staggered. Terri gave us free-range to use any of her craft/art supplies and allowed us to stay as long as we needed to in order to finish decorating our box. Some people lined their boxes with fabric and used Terri's sewing machine to finish the job. She offered ideas and perfected the role of creative conspirator.

Wrap-up: We now use the box as an art-catch-all on the kids' craft table. It turned out great for storing the kids works in progress as well as general supplies.

One more parting shot of the fabulous studio...


Thursday, June 9, 2011

SAW Spring 2011: Post 2 of 4 Block Printing


My first class at SAW was Block Printing with Lizzy House. Before I go on further I just want to say (er... type) how much I enjoyed Lizzy's teaching style. For me, for my "creative process" (ugh, I feel like that term is so pretentious... how about "mojo standard operating procedure" instead?)- for my mojo standard operating procedure, (MSOP for short) I felt Lizzy provided just the right type and amount of information in order for each person to successfully learn how to lino block print.

-Overview of the Class-


Beginning: The class started with each person introducing themselves and why they decided to take the course. Lizzy then encouraged us all to work on our designs (sketches) and informed us that she would be going around the room to look at our materials (one at a time). Everything and everyone was great (per Lizzy). All the materials were great, nothing was a problem, we'd all done extremely well even though we'd all brought something slightly different. She used the opportunity to review all the different kinds of carving medium and described typical use for each. Additionally, she took some time to review how to make a simple repeating pattern (turning quadrants 1, 2, 3, 4 into 4, 3, 2, 1). Otherwise, she moved about the room answering questions, offering guidance, and periodically checking on each person/our comfort level (if we were quiet or didn't ask for help).


Middle: Some people brought transfer/tracing paper and pencils and were able to rub their designs on to the lino block. Others (like me) hand drew the design on the block with a pencil. Lizzy gave an overview of safe carving procedures and stressed repeatedly that one should never ever carve toward oneself nor place an errant finger in the path of the carving instruments. The carving portion of the day lasted the longest (approximately 4 hours).


End
: Lizzy had everyone gather around a large table and she demonstrated proper use of the glass, ink and brayer in applying ink to the lino block. The class then pulled together and each person set up a station with a different color. We spent the last part of the day inking the lino block and printing the fabric (about 2 hours).


Wrap-up: After we were done and all materials/work spaces had been cleaned up and stored away, Lizzy had the group lay all the fabric out and circle chairs around the finished pieces. We each described what surprised us and we liked/didn't like about the process/course- somewhat of a shared lessons learned.


My specific MSOP: I was completely unprepared. I had no idea what I was going to do nor did I bring anything with which to sketch (I'm not a sketcher nor do I consider myself an artist; the closest thing I do is doodle incessantly during conference calls and staff meetings). I scoured my bag and found a hotel pen and the small blank journal provided to us in the SAW bag (thank goodness for the SAW goodie-bag). As Lizzy went around the room it soon became apparent that I had the largest lino block (6X9) and, therefore, would have to sketch something that would fill the majority of the block but I didn't want to be cuckold to a large single image. Everyone in the class was supportive and generous. My table-mate, Caarin (I think I spelled that right,) offered helpful encouragement and we troubleshooted the first phases of carving together; I was able to borrow a pencil from the lovely Carol and a no slide mat from Lazymama. In the end I was astonished by all the kind words for my design and felt very lucky to have been in the company of so many talented women.

I was so encouraged by the comments on my design that I've decided to plan set of fabrics centered around these independent owls. It will take some time but I hope to have a complete set ready in the fall... will most likely use spoonflower. I figure, even if no one is interested in the fabric, at least I'll have a great time with my MSOP creating it.